
For all InversionEdge Sharpening FAQs CLICK HERE
The world-first Solidteknics™ InversionEdge™ Sharpening System (patents pending) was developed by Mark J. Henry to embody a lifetime of practical knife sharpening experience and engineering research into this new ‘ultimate, no-compromise, purist’s sharpening system … for everyone.’
While developing his ultimate expression in expert cook’s knives, Söliditi™ C5, with the ultimate purist’s edge – the notoriously difficult to sharpen Japanese chisel edge – Mark J. Henry knew he had to eliminate the ancient and persistent sharpening problem. Only then would more Western cooks discover why the chisel edge blade has been so revered for centuries by the master Japanese swordsmiths and knife makers. These edges are just too difficult to sharpen with traditional water stone, so, sadly, these sharpest of all edges are rarely used by non-enthusiasts.
He also wanted to ensure his system worked better than any other sharpening method for breathing new life into all the Western knives already laying dulled and dormant in kitchens everywhere, with razor sharp edges better than their original factory edges.
Gadgets destroy Western blades (short term sharpening improvement, with far too much metal removal), and cannot be used on Japanese chisel edges. In fact, they should simply never be used on any good knife.
It is well known that Japanese water stones are the best for serious knife users. They are used by knife masters (and mistresses!) everywhere, particularly in Japan, but rarely by the average cook in the West, due to the high levels of skill, experience and time required.
InversionEdgeTM Pro Sharpening System Instructions
For simple, fast, razor sharp pro edges on Söliditi™ C5, and all Japanese and Western knives: single-sided chisel edges and regular two-sided edges.
Read real reviews from our Early Adopters HERE!
The InversionEdgeTM Sharpening System includes:
1 x noni™ tray
2 x Love Handle
4 x Rubber Magnets
Ultrafine grit Naniwa stone - 3000/8000 (only if ordered)
Coarse Naniwa stone - 220/1000 (only if ordered)
N.B. when it comes to grit, the higher the number, the finer the grit.

Restoring your regular Western/Gyuto symmetrical blades
InversionEdgeTM will create a far superior edge to your original factory edge, no matter which brand. We won’t be confusing you with engineering theory here, and won’t have time for Knerd (knife nerd) tech debates. Just follow our instructions and you’ll have the best edges you’ve ever experienced!
If your current knives are thin Japanese gyuto with edges (claimed to be) at 15 degrees, or thick European edges (or their offshore copies) around 20 degrees (usually more), disregard those edges and reconstruct them according to our instructions. InversionEdge will produce far superior edges to anything from any of those factories.
InversionEdgeTM not only allows you to create a cutting edge that is symmetrical (like almost all Western/Gyuto blades), but it also allows you to easily create the famed ‘double bevel’ on each side of the blade (almost impossible by hand). So, instead of one generic bevel on each side, our InversionEdge allows you to create two: one big narrow angled secondary bevel for least cutting resistance, and one tiny primary bevel for strength and durability with extreme sharpness.
We recommend following the below written instructions in conjunction with our instructional video.
Step 1: Choose your geometry
Our InversionEdge sharpening system allows you to make both symmetrical and asymmetrical edges.
Symmetrical bevels- Maintain standard symmetrical bevels (edges) - same bevels each side. Slightly easier, but not as good as asymmetrical edges.
Asymmetrical bevels - convert your old blade to asymmetrical for higher performance cutting. This bevel (edge) is highly recommended if you want ‘next level’ pro cutting - better than most pros in the West who don’t know about these edges yet!
Learn more about different blade types here.
Step 2: Choose your stone grit combination and attach the Love Handle
Choose your stone
Fine grit stone: If your blade is in very good, thin, sharp condition or you’ve used InversionEdge on this blade before, choose the fine combination of 3000/8000 (or similar).
N.B. If you're unsure how blunt/worn your blade is, start with the fine combination.
Course grit stone: If this is the first time for this particular blade on InversionEdge, and your blade is quite dull and worn, choose the Naniwa coarse grit combination of 220/1000 (or any other brand with approximate grits)
Attach the love handle
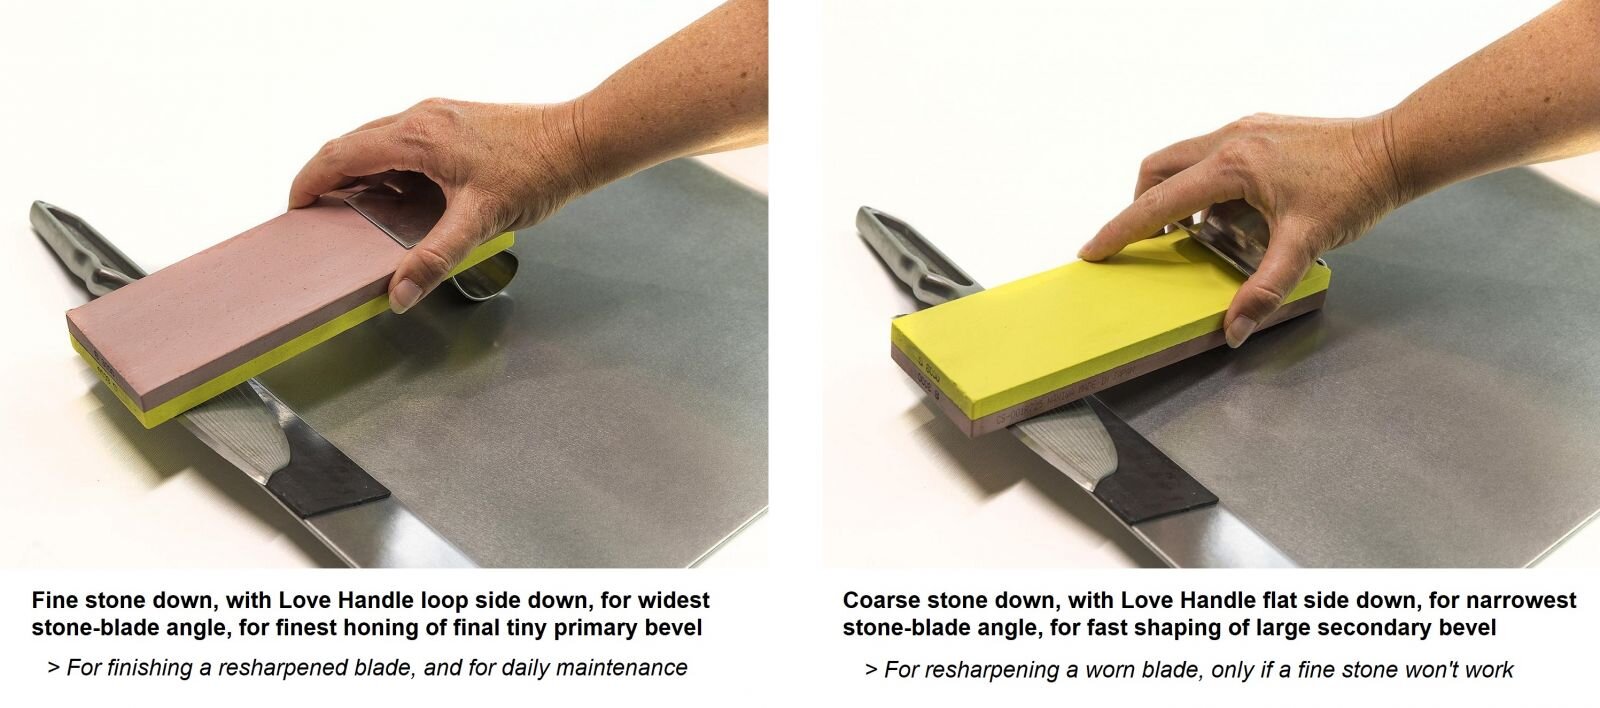
Push the Love Handle spring clip onto one end of your combination stone, with the higher loop side on the fine side of the combination stone (flat side of clip against the coarse side of stone).
Step 3: Choose angled platform on nöni™ tray
The nöni™ platforms aren’t marked for angles, but you can see by eye that there are two different angles to the platforms- the fine-angled platform and wide-angled platform. The fine platform is lower, with a ‘sharper’ angle to the bench, and the wide platform sits higher. If in doubt, measure distance to the bench (the fine will be less distance to the bench).
Fine angled platform - choose the fine angled platform for almost all knives - Western, Japanese, Söliditi
Wide angled platform - choose the wide angled platform only for blades that need toughest symmetrical edges (sporting knives, workshop knives, big hacking knives, knives you abuse, etc).

Step 4: Mount your blade to the rubber magnet
Stick the magnet to one end of the chosen edge, in line with the tray top edge.
Mount knife securely on to the magnet (you can choose to stick an additional magnet on top of the knife, for extra strength)
Ensure the cutting edge of the knife protrudes above the magnet all along its length (so it just protrudes at tip and heel – the middle curve will protrude more, and that’s okay).
Step 5: Sharpen/hone until sharp!
For thin, sharp blades:
Wet the stone (no need to soak our Naniwa stones).
Start with the fine grit side of stone to refine your primary bevel - Love Handle loop should be facing down. The Love Handle will automatically set the correct angle. Use almost any motion (see video), but mostly lengthwise with a little crosswise, to sharpen the blade from tip to heel.
Whilst the exact motion isn't important, it's best to avoid pressing down whilst dragging the stone back toward the edge. This doesn't hurt the knife, but can shave your stone away faster than necessary. Press while pushing the stone away from you, and release while dragging back, even if the motion is mostly lengthwise.
When it is sharp, flip the blade over and stick it on the other end of the same platform. Repeat until bevels are approx. the same size on both sides of blade (not crucial: just keep bevels both sides small as possible and roughly even)
For thick, dull blades:
Wet the stone (no need to soak our Naniwa stones)
Start with a coarse grit stone (220 on our Naniwa stone) to quickly reshape the rounded edge to a much better finer-angled secondary bevel. Use almost any motion (see video), but mostly lengthwise with a little crosswise, to sharpen the blade from tip to heel. Whilst the exact motion isn't important, it's best to avoid pressing down whilst dragging the stone back toward the edge. This doesn't hurt the knife, but can shave your stone away faster than necessary. Press while pushing the stone away from you, and release while dragging back, even if the motion is mostly lengthwise.
When it is sharp, flip the Love Handle over to the fine side of combo stone and create a very small primary bevel (only 1 minute – keep this bevel as small as possible). Flip the blade over and stick it on the other end of the same platform.
N.B. The handle may scratch the tray. This is of no concern as it is designed to be a working tool. However, if you'd like to protect the tray, simply place some paper, tape or fabric between the handle and tray, or attach to the base of the handle.
Symmetrical edges
Repeat until bevels are approximately the same size on both sides of blade (not crucial: just keep bevels of both sides small as possible and roughly even).
Asymmetric edges
Only use your finest stone (preferably 8000 grit Naniwa) on the side opposite to your main bevels to create a tiny, almost invisible bevel. This ensures the edge is strong enough to avoid chipping/folding, but thin enough to bight and slice with almost no resistance.
For the sharpest fine slicing edge, create a mirror polished edge by repeating the process above (Step 5) with the fine Naniwa (or similar) combo stone 3000/8000 grit. You will be essentially polishing over the bevels you already created with the coarser combo stone, so only do 1 minute per side max for a mirror polish.
Step 6: Strop your edge to straighten the burr
After the final fine stage of honing the primary bevel (whether symmetric or asymmetric edge), there will probably remain a small ‘burr’ along the cutting edge. This is simply the thin cutting edge slightly folded over. Like the old barbers did on their leather strops, you can improve the sharpness further by using a leather or fabric strop (or heavy denim), or by gently dragging the cutting edge across our rubber magnets, which are charged with 8000 grit abrasive powder for this purpose. Watch the instruction video to see how this is done, so you don’t overdo it!
Notes
For all InversionEdge Sharpening FAQs CLICK HERE
How how long does it take to sharpen?
It all depends on the condition of your blade. The easiest is to work for 2 minutes then test the edge. If it feels sharp, stop, otherwise you’re just removing more precious blade material for no benefit. We recommend cutting some food, particularly tomato, as a good real-world test. Do not use finger feel unless experienced! If edge isn’t sharp, continue the process and test every few minutes. If the fine stone really isn’t working, switch to the coarse stone to create new secondary bevels, repeating sharpening process until edge feels sharp, then switch back to the fine stone to finish off the tiny primary bevel.
Does the handle scratch the tray?
This system is designed to be a working tool, however if you want to protect your tray to avoid scratching, place some paper/fabric/tape underneath the handle.
Blade longevity - the key to blade longevity is to use the finest stone as much as possible, and only use a coarse stone as little as possible when the fine stops working.
Sharpness - the key to sharpness is to keep the primary bevel (fine stone, wider angle) as small as possible, around 0.2mm – almost invisible to the untrained eye. This will provide enough strength to avoid excessive edge damage, while keeping resistance to penetration to a minimum. A big primary bevel will need to push more food aside, making it harder to cut, no matter how sharp and finely honed the very cutting edge is.
Blades Explained


For more background information on the InversionEdgeTM Sharpening System, click here.